OnSiteLight Features
Features and operating principles for OnSiteLight.
Start-up
When the system starts or restarts, the lighting is switched on automatically if required:
- In daylight, all lamps are switched off
- In darkness, all lamps are switched on at the brightness configured for basic lighting
Lighting Levels
The system uses different lighting levels that can be freely configured.
Switches the lighting off.
The level for minimum lighting is intended to illuminate areas enough that they can be located. For example, areas can be located from a distance, but navigation in the area will be difficult.
- Typically used when absolute minimum lighting is required
- Intended only so areas can be located
The level for basic lighting is intended to illuminate areas so people can navigate and move around. For example, roads and objects are easy to see, but work in the area will be difficult.
- Typically used when basic lighting is required and people must be able to move around the area
- Intended only for navigation and movement in areas
The level for work lighting is intended to illuminate areas so work can be carried out.
- Typically used when work must be carried out in the area
- Intended only for areas where work is carried out
The level for maximum lighting is intended to illuminate areas at maximum output.
- Typically used when maximum lighting is required
- Intended only for maximum illumination of areas
Smart Control
Lighting control has several operating modes:
- Constant off - permanently off
- Constant on - switches on to work lighting until switched off again
- Time controlled - switches on to basic lighting at sunset and switches off at sunrise
- Lux controlled - switches on to basic lighting in darkness after the selected lux level and switches off again when it becomes light
Safety Control
To increase uptime, time control is used as backup for lux control.
- If lux control fails, the system automatically switches to time control
- When lux control is fault-free, the system switches back to lux control
Operation
The lighting can always be overridden manually.
Coupling Principles
The system controls the lighting either steplessly or in steps.
The stepless and step-based coupling principles can be combined and control the lighting intensity as shown in the drawing:
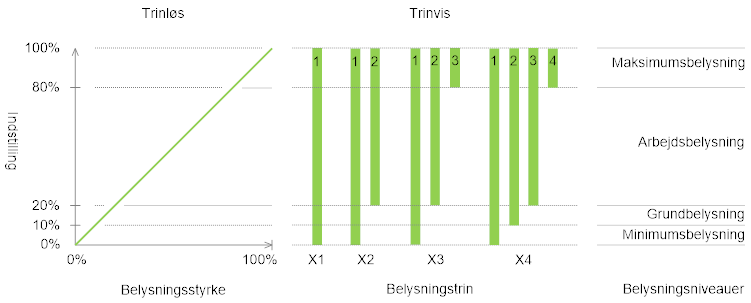
Stepless - the lighting is regulated steplessly from 0 to 100% lighting intensity
Step-based - the lighting is regulated in 1 to 4 lighting steps (X1..X4)
- Requires equipment with on/off outputs and relay-controlled lamps
Examples of how lighting steps are used:
| Areas | Lighting steps | Digital outputs | Operating principle |
| Example 1: | |||
| Lighting area A | X1 | Output 1 | Control of areas A, B, C and D with lighting step X1 - each area can be switched on and off |
| Lighting area B | X1 | Output 2 | |
| Lighting area C | X1 | Output 3 | |
| Lighting area D | X1 | Output 4 | |
| Example 2: | |||
| Lighting area A | X2 | Output 1 + 2 | Control of areas A and B with lighting step X2 - each area can be switched on and off in 2 steps |
| Lighting area B | X2 | Output 3 + 4 | |
| Example 3: | |||
| Lighting area A | X3 | Output 1 + 2 + 3 | Control of area A with lighting step X3 - the area can be switched on and off in 3 steps |
| Lighting area B | X1 | Output 4 | Control of area B with lighting step X1 - the area can be switched on and off |
| Example 4: | |||
| Lighting area A | X4 | Output 1 + 2 + 3 + 4 | Control of area A with lighting step X4 - the area can be switched on and off in 4 steps |